During ladder circuit editing, when you
click on the ![]() or
or ![]() icon to create a special function coil, a special
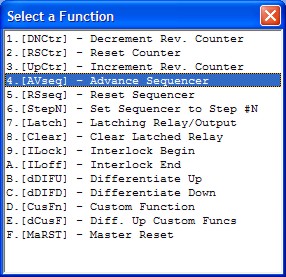
function menu will pop up as shown below:
icon to create a special function coil, a special
function menu will pop up as shown below:
During ladder circuit editing, when you click on the
or
icon to create a special function coil, a special function menu will pop up as shown below:

1. Reversible Counter Functions: [DNctr], [Upctr] and [RSctr]
The [DNctr], [UPctr] and [RSctr] functions work together to implement reversible counter functions on any of the 128 counters supported by i-TRiLOGI.
The ordinary down-counter (created by clicking on the
icon) essentially decrements the counter value by 1 from the "Set Value" (SV) and will stop when its count becomes zero. Unlike the ordinary down-counter, a reversible counter is a circular counter which changes the counter present value (PV) between 0 and the SV. When you try to increment the counter past the "Set Value", it will overflow to become '0'. Likewise if you try to decrement the counter beyond '0', it will underflow to become the "Set Value".
All three counter functions [DNctr], [UPctr] and [RSctr] can operate on the same counter (i.e. assigned to the same counter label) on different circuits. Although these circuits may be located anywhere within the ladder program, it is recommended that the two or three functions which operate on the same counter be grouped together in the following order: DNctr], [Upctr] and [RSctr]. Note that NOT all three functions need to be used to implement the reversible counter.
Decrement Counter [DNctr]
Each time when the execution condition of a [DNctr] function changes from OFF to ON, the present value of the designated counter is changed as follow:
If the counter's present value (PV) is inactive, load the counter register with the "Set Value" (SV, defined in the Counter table) minus 1.
If the counter’s present value (PV) is already ‘0’, then load the counter’s PV with the SV defined in the counter table and turn on the counter's contact (also known as the completion flag).
Otherwise, decrement the counter PV register by 1.
Each time when the execution condition of an [Upctr] function changes from OFF to ON, the present value of the designated counter is affected as follow:
If the counter is inactive, load the counter register with the number '0001'.
If the counter's present value (PV) is equal to the Set Value (SV, defined in the Counter table), load the counter register with number '0000' and turn on the counter's contact (also known as the completion flag).
Otherwise, increment the counter PV register by 1.
Reset Counter [RSctr]2. Sequencer Functions: [AVseq], [RSseq] and [StepN]When the execution condition of this function changes from OFF to ON, the counter will reset to inactive state. This function is used to reset both a reversible counter and an ordinary down-counter coil.
Please refer to the documentation on Using i-TRiLOGI Sequencers
Latching relay is convenient for keeping the status of an execution condition even if the condition is subsequently removed. The program elements that are assigned as Latching Relays will remain ON once they are energized. Only Relays and Outputs may be assigned as Latching Relays.
On selecting [Latch] function, you can use the left/right cursor keys or click on the left/right arrow keys to move between the Relay and Output tables. The selected relay or output will now be assigned as a Latching Relay. You will be able to see the label name of the program element above the [Latch] symbol in the ladder diagram.
Although latch-relay can be used in place of self-latching (Seal) circuits, a latch-relay in an interlock section will not be cleared when the interlock occurs. Only a self-latching circuit as shown in the following will be cleared in an interlock section:
4. Clear Relay Function [Clear]
5. Interlock [ILock]To de-energize a program element that has been latched by the [Latch] function, it is necessary to use [Clear] function. On selecting [Clear], choose the output or relay to be de-energized. When the execution condition for that circuit is ON, the designated output or relay will be reset. In the ladder diagram, the program element label name will be shown above the [Clear] symbol.
If the execution condition for [Latch] and [Clear] functions are both ON at the same time, then the effect of the designated bit depends on the relative locations of these two functions. Remember that an output or relay bit energized by [Latch] will remain ON until it is turned OFF by [Clear]. It is recommended that [Clear] circuit be placed just after the [Latch] circuit for the same output or relay controlled by these two functions. This ensures that [Clear] function has higher priority over [Latch] function, which is normally so in hardware latch-relay or other industrial PLCs.
6. Differentiate Up and Down [d DIFU] and [d DIFD]The "Interlock" [ILock] and "Interlock Off" [ILoff] functions work together to control an entire section of ladder circuits. If the execution condition of an [ILock] function is ON, the program will be executed as normal. If the execution condition of [ILock] is OFF, the program elements between the [ILock] and [ILoff] will behave as follow:
all output coils are turned OFF.
all timers are reset to inactive.
all counters retain their present values.
Latched relays by [Latch] function are not affected.
[dDIFU] and [dDIFD] functions are not executed.
all other functions are not executed.
An Interlock section is equivalent to a master control relay controlling a number of sub-branches as follow:
Note that [ILoff] is the only function that does not need to be energized by other program elements. When you use one or more [ILock] functions, there must be at least one [ILoff] function before the end of the program. Otherwise the compiler will warn you for the missing [ILoff]. The logic simulator always clears the Interlock at the end of the scan if you omit the [ILoff] function.
You can program a second or third level Interlock within an Interlock section using a few [ILock] functions. However, you only need to program one [ILoff] function for the outermost Interlock section, i.e. [ILoff] need not be a matching pair for an [ILock] function.
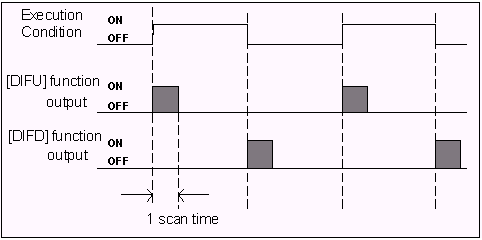
When the execution condition for [dDIFU] goes from OFF to ON, the designated output or relay will be turned ON for one scan time only. After that it will be turned OFF. This means that the function generates a single pulse for one scan time in response to the rising-edge of its execution condition. When its execution condition goes from ON to OFF nothing happens to the output or relay that it controls.
On the other hand, when the execution condition for [dDIFD] goes from ON to OFF, the designated output or relay will be turned ON for one scan time only. After that it will be turned OFF. This means that the function generates a single pulse for one scan time in response to the trailing-edge of its execution condition. When its execution condition goes from ON to OFF, nothing happens to the output or relay that it controls.

NOTE: The [dDIFU] function can now be implemented as a single contact with the Rising-Edge contact that is triggered once every time a rising edge is sensed. More information on this new contact can be found in the Contacts section of the "Contacts and Coils" help page.
7. Custom Functions: [CusFn] and [dCusF]
These two functions allow you to connect a user-defined custom function (CusFn) to the ladder logic as if it is a relay coil. Custom functions are created using the integrated editor provided by i-TRiLOGI Version6.x. Please refer to TBASIC Reference manual for detailed descriptions of custom function creation and deployment methods.
8. Master Reset
An ON condition to this function clears all mailbox inputs, outputs, relays, timers and counter bits to OFF, resets all timers counters/sequencers to inactive state, and clears all latched relay bits. All integer variables will be cleared to zeros and all string variables will be assigned to empty string.