Full-Screen Monitoring
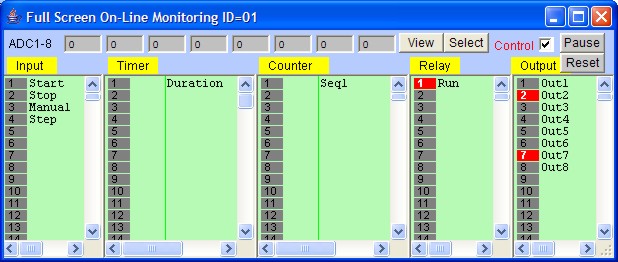
After you have successfully log-in to the TLServer (for explanation of log-in procedure, please refer to "Log-In to TLServer") , a "Full-Screen Monitoring" window will be opened for you to monitor and control your PLC. The ID address of the PLC selected for on-line monitoring will be shown on the window's title, as shown below:
The Full Screen Monitoring screen comprises 5 columns: Input, Timer, Counter/Sequencer, Relay, and Output. With the exception of the Relay table which contains up to 512 elements, all other columns contain 256 elements each and each one has a vertical scroll bar. You can use the mouse to scroll each column independently to locate the desired I/O.
The label names for the inputs, outputs, relays, timers and counters defined earlier in the I/O tables automatically appear in their respective columns. To the left of each label name column is an "LED" lamp column which indicates the ON/OFF state of respective i/os. A red color lamp represents the ON state of an i/o, whereas a dark grey color lamp represents an OFF state. The I/O number is indicated in the middle of the lamp.
The monitoring screen requires the use of the mouse to work properly so it is important to remember the mouse button actions as follow:
Left Mouse Button Turn ON the PLC's I/O when pressed.
Turn OFF the PLC's I/O when button is released.Right Mouse Button Toggle the PLC's I/O when pressed once.
(i.e. OFF becomes ON and ON becomes OFF)
There is a check box ![]() near the upper right hand corner of
the on-line simulator. This check box must be checked before you can force
set/reset the PLC's I/O. When you run the "Full Screen Monitoring" the first
time, this box is unchecked to avoid acccidentally changing the state of a PLC's I/O.
near the upper right hand corner of
the on-line simulator. This check box must be checked before you can force
set/reset the PLC's I/O. When you run the "Full Screen Monitoring" the first
time, this box is unchecked to avoid acccidentally changing the state of a PLC's I/O.
Note: The "Control" checkbox is disabled if your Access Level has been defined only as "Visitor" in TLServer since a "Visitor" has no right to affect the PLC's operation.
Important Notes
|
View, Select, Pause, Reset Buttons
| View TBASIC Variables. See document on Viewing System Variables | |
| Halt the PLC. The
"Pause" lamp of the PLC should be lighted up after you click the pause button. This button is disabled when the "Control" check box is not selected. |
|
| Reset All I/Os and
data in the PLC. (same as <Ctrl-R>). This button is disabled when the "Control" check box is not selected. |
|
| Allows you to select a PLC for monitoring by specifying the ID address. Up to a maximum of 256 PLCs may be connected to one TLServer and i-TRiLOGI allows you to select any one of the PLCs for on-line monitoring and/or programming. When clicked, the password dialog box will be opened with only the ID field available for you to enter the new ID value. |
Note that whether the highlight is turned is based strictly on the logic state of an element. You will have to interpret whether the contact is opened or closed by examining if it is a normally-open (N.O.) or a normally-closed (N.C.) contact. A highlighted N.C. contact means that the contact is opened, whereas a highlighted N.O. contact means that the contact is closed.