Show Posts

This section allows you to view all posts made by this member. Note that you can only see posts made in areas you currently have access to.


Topics - support

Pages: 1 [2] 3 4
16
Technical support / MOVED: Program download stopped halfway
« on: April 11, 2011, 11:42:08 AM »
This thread has now been moved to the Frequently Asked Questions board:

http://www.tri-plc.com/yabbse/index.php?board=2;action=display;threadid=1688

17
Frequently Asked Questions / Storing Web pages in Nano-10 & FMD PLCs
« on: February 23, 2011, 11:36:57 PM »
The Nano-10, FMD and F-series PLCs only have 60K bytes of file space to store user's control web page.

These PLCs use a very simple file system. File name can only start with one character (0,1,2,....9,A,B,C....)and can have only 3 character extension.

Each file name is allotted 2K bytes of space but each file name can occupy multiple slots, in which case it takes over the space of other files.

That means 0.xxx will occupy the first 2K bytes, 1.xxx will occupy the next 2K bytes, and so on. A file may extend beyond its own allocated file space and take over the space of its adjacent files.

E.g. 0.xxx can occupy the space of 1.xxx and 2.xxx, therefore allowing you to store a file that is up to 6K bytes long. However, that also means you cannot store any file with name 1.xxx or 2.xxx or it will overwrite the data. Your next file should occupy file name from 3.xxx onwards.

The default control web pages 0.htm is > 2K bytes but < 4K bytes, and therefore occupy the space of 0.xxx and 1.xxx. The second control web page is therefore stored at 2.htm. If you need to store your own special files, such as small JPG or CSS file, they can be stored from 4.xxx up to before N.xxx.

More complex graphics or css file can be stored on any internet or intranet webserver (or stored in the TLServer's /public folder) instead of on the CPU flash memory.

18
Technical support / MOVED: ADC Fluctutations.
« on: January 10, 2011, 03:51:42 PM »

19
Important Notes

We recently received several reports that program transfer is often aborted half-way or require multiple attempts to transfer program to the PLC. This happens whether the program transfer is via TLServer or the Ethernet.

It appears these problems only surface after user has upgraded to JRE 1.6.0_24. (We did not receive similar complaints on earlier version of JRE 1.6.0, although there were other issues on some PC). So far in all cases the problem was resolved after the users uninstalled JRE 1.6.0_24 and re-install JRE 1.4.2.  Therefore we strongly recommend that you keep your JRE 1.4.2 even if you must upgrade to JRE 1.6.0_24.


***********************************************************************************

Step 1 - Find java.exe
Before you run the SetupTL6.exe file on your Windows PC, please check if your PC already has java.exe file installed. You can do this by doing a search on your computer hard disk for the java.exe file.

You may find a copy of java.exe on the C:\Windows\syswow64 folder. But whats more important is the copy of java.exe in the Java Run-Time Environment (JRE) folder such as the following:

C:\Program Files (x86)\Java\jre6\bin

If you find the path of the java.exe in the JRE folder, please copy it down and proceed to STEP 2.

-----
If you don't find any java.exe in your PC's hard drive, that means your PC is not shipped with a JRE. We recommend that you install the 32-bit JRE 1.4.2 which we found to be the most stable version of Java and work best with the i-TRiLOGI. You can download the free JRE 1.4.2 from the following link:

http://www.oracle.com/technetwork/java/javasebusiness/downloads/java-archive-downloads-javase14-419411.html#j2re-1.4.2_19-oth-JPR

When you are there, download the "J2SE v 1.4.2_19  JRE" will do. There is no need to download the SDK unless you want to write your own Java program.


20
Frequently Asked Questions / Sending Email via Authenticated SMTP Server
« on: September 30, 2010, 05:33:24 PM »
All TRI-PLC with built-in Ethernet can send email via the SMTP server provided by the ISP which typically do not require authentication (since the ISP knows from the IP address whether the machine attempting to send email is one of its subscriber). However, if your ISP happens to insist on authentication before it will allow sending email via its SMTP server, then you may not be able to send email directly through this ISP.  

Fortunately, the TLServer version 3.15 software that is included in your i-TRiLOGI software package does have the option of authenticated SMTP connection, and you can route your PLC's email via the TLServer using the <REMOTEFS> tag. The following are the step by step instructions:

1. Setup Authenticated Emailing with TLServer

    * Start TLServer on the PC in which it will run 24/7.
    * Goto "Setup Emails"
    * Enter the SMTP server and port number of your outgoing mail server (default port is 25).
    * Enter the username and password for your SMTP server authentication.
    * Click on "Test" to test the settings. You will need to enter a destination Email address.
    * Close the Setup Emails window to enter the settings.
    * Contact your ISP if you don't know any of the above details. See the Setup Emails section of chapter 3 in the TL6 Programmers Reference Guide for more information.

2. Setup Port Forwarding for the Network that the PC running TLServer is on

If the TLServer is not on the same local area network as the PLC, then the TLServer must be made accessible to the Internet to receive TCP/IP request from remote PLCs in order to process email on behalf of the PLCs.

    * The network that the PLC running TLServer is connected to must have port forwarding setup so that remote clients (PLCs) can connect to TLServer.
    * You will need the IP address and port number shown on TLServer (the one you will be running 24/7)
    * Follow the instructions from the "Accessing The PLC from Internet" Section of the F-series or Nano-10 user manual (chapter 2.8 or 2.7 respectively) to setup port forwarding.
    * Contact your IT administrator if you are unsure.

3. Program a Remote PLC to Send an Email

You will need the following information in your program:

    * Internet IP address. This is provided by your ISP for the network that TLServer is running on. This is not your PLCs IP address or TLServers IP address.
    * Port number that TLServer is using. This is shown on TLServer. This is not the SMTP port number that you setup for Emails in TLServer.
    * Email address of the recipient. The sender Email address is not important but must be valid.


Use the following code in a custom function. Once the function is executed, the Email will be sent (with your specific settings of course).

PRINT #4 "<RemoteFS 192.168.1.180:9080>" 'make a remote connection to your Internet IP address.
PRINT #4 "<EMAIL recipient@email.com>" ' replace with your destination email
PRINT #4 "SENDER: sender@email.com"   ' should be a valid server address
PRINT #4 "SUBJECT: Email sent by your PLC"
PRINT #4 "I am a TRiLOGI PLC"      
PRINT #4 "This is a Hello Message"
PRINT #4 "</>"      ' end the email.
PRINT #4 "</RemoteFS>"    ' end the remote connection

Note that the IP address used in the above code should be replaced with the Internet IP address and the port should be the one used by TLServer (default is 9080). If port forwarding is setup correctly, a PLC should be able to connect remotely over the Internet using the Internet IP address of the location where TLServer is running and the port number which will be forwarded to the local IP address of the TLServer (the IP address that TLServer shows)

Also note that the above code does not do any error checking so you won't know if it is successful unless you physically see the Email. You can improve the code by adding error/status checking. You can also look at the TestEthernet.PC6 program for more examples on sending Email and making remote TLServer connections.

21
Technical support / Can i-TRiLOGI run on 64-bit Windows 7?
« on: May 09, 2010, 10:43:13 PM »
We have recently tried to install Internet TRiLOGI version 6.31 and TLServer 3.15 on a new 64-bit version of Windows 7 and the following describe what we experienced.

1) When using the command prompt and type in "java -version" the O/S reported that java command is not recognized.

2) We then install the JRE 1.4.2 that is shipped with the i-TRiLOGI CD-ROM. After installing the JRE 1.4.2 we installed the i-TRiLOGI program.

3) We could run the i-TRiLOGI and TLServer 3.1 by opening the "Start" Menu and selecting from the "Internet TRiLOGI". We found that TLServer 3.15 does work perfectly with the USB-to-RS232 and USB-to-RS485 adapter. i-TRiLOGI client also could communicate with the PLC's serial port via the TLServer or directly with the PLC's Ethernet port.

4) However, attempt to run "TLServer (with Java console) failed. Attempts to run the batch files "TL6.bat" and "TLServer3.bat" also failed.

5) We went to the command prompt and type in "java -version" and Windows 7 64-bit still reported that "java" is not a recognized command. However, a search of the hard disk for "java.exe" revealed Windows 7 has already installed "java.exe" in two folders:

C:\Program Files (x86)\java\jre6\bin\  and

C:\Windows\SysWOW64\

So apparently Windows 7 was already shipped with JRE 1.6.0_20 and for unknown reason the JRE 1.4.2 that we installed was no where to be found! However, again for unknown reason Windows 7 did not add java.exe to the system path of command prompt even though Java is being invoked when the .jar file are executed directly.

We modified the content of the file "TLServer3.bat" to the following:

   C:\Windows\SysWOW64\java -jar TLServer31.jar

and also the content of "TL6.bat" to the following:

   C:\Windows\SysWOW64\java -jar TL63.jar %1

and both files are able to run.

So we recommend not to install any JRE when you first get your Windows 7 PC but do a search of "java.exe" in your hard disk to verify if a JRE is already installed. If so, then all you need to do is to install the Internet TRiLOGI version 6.31 to your PC and it should run.

Note that TLServer shipped with older version of i-TRiLOGI that don't work on Windows Vista will also not work on Windows 7. You should follow the "Upgrade" link on the "Help" menu to download the latest version of I-TRiLOG from our website before attempting to install on the Windows 7 PC. Alternatively, if you still have in i-TRiLOGI CD you can look for the "upgrade.htm" file inside the CD to find the upgrade link, username and password to download the latest i-TRiLOGI.


22
Technical support / MOVED: Panelbuilder32
« on: March 01, 2010, 09:31:46 AM »
Question moved to General discussion because it was not a TRi PLC related topic.

http://www.tri-plc.com/yabbse/index.php?board=5;action=display;threadid=1523

24
Archived FAQs / TRiLOGI I/O Table displaying garbled image
« on: August 20, 2009, 02:48:36 PM »
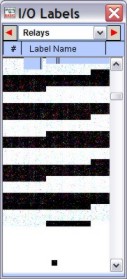
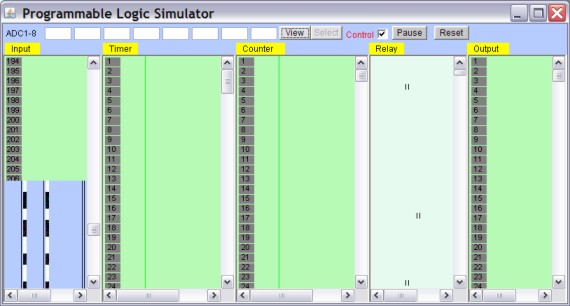
Some users who have their java upgraded to JRE 1.6 face a problem that the RELAY table and sometime certain range of other I/O tables display garbled image instead of proper I/O label. One example is as shown below:


We have so far determined that this problem is caused by either a bug in the JRE 1.6 or a bug in the Windows XP Direct X driver.  Hence the problem seems to occur only to a small number of users of Windows XP SP2 or SP3 (most who reported similar problem are using Dell PCs). When the user uninstalls JRE 1.6 and re-install JRE 1.4.2 that are shipped with the i-TRiLOGI software the problem would disappear immediately.

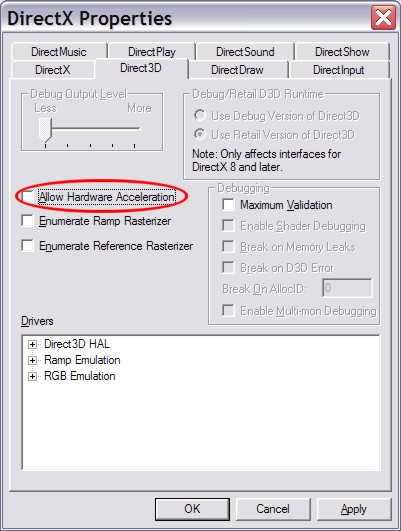
Further testing on a system that we have come across showed that if you disable the Hardware Accelerator in the DirectX 3D driver the problem would also disappear. What you need to do is to go to the Control Panel and find the DirectX driver (if there is one), open it up, click on "Direct 3D" tab, then uncheck the "Allow Hardware Accelerator" check box. Then click "OK". Restart i-TRiLOGI and check the RELAY table to see if the entire table will be displayed properly.


That is to say, if you face similar problem, you can either:

1) Downgrade JRE 1.6 to earlier version, or
2) Disable hardware accelerator in the Direct X driver.

So far all users who faced similar issue as described above have managed to resolve it by downgrading to JRE 1.4.2. If you prefer to keep JRE 1.6 then you can try to disable hardware acceleration in the Direct X or try disabling some hardware settings in the Direct X driver. Please email support@tri-plc.com if you manage to solve the problem with other methods.
 
TIPS

One of our users Mr  Brian Sorbe has kindly provided the following tip for launching the Direct X settings window:

"Typically on XP machines, the easiest way to launch the directx settings is to simply press start, run, and type in 'dxdiag' and that launches the direct x mod page."

For users who must keep the JRE 1.6 (probably because some applications require JRE 1.6 and will not work on 1.4.2) but encountered the garbled I/O table issue, please try to disable the Direct3D hardware acceleration to eliminate the problem.


25
Technical support / Window Vista
« on: September 22, 2008, 09:34:50 AM »
We have just released a new TRiLOGI upgrade - i-TRiLOGI version 6.14 and TLServer 3.1 are now ready for download from our website. Please follow the "Upgrade" link in your TriLOGI "Help" menu and go to our website to download the new version.


The following are changes to TRiLOGI version 6.14 & TLServer 3.10 released on Sep 22, 2008

1) Some users of Windows Vista complained of compatibility problem that resulted in the frequent breakdown of the serial communication when previous TLServer version runs on Windows VISTA.  TLServer 3.10 fixes this Vista problem. This release also informs you of the reason if TLServer could not start due to missing serial driver (often happen when Java JRE is upgraded).

2) Fixed a bug in earlier TRiLOGI 6.1x version which would not be able to open another file if the current file name is longer than 30 characters but shorter than 38 characters.

26
Technical support / Application Notes Link
« on: December 10, 2007, 10:05:47 PM »
We are pleased to announce that a special web page has been setup to present some application notes on using our PLC in various applications. Sample source code and detailed explanation are included for free download.

To view the application notes, please mouse over the menu tab on this website:

 "Application -> Application Notes"

Currently 5 new application notes have been presented. More application notes will be added as we develop and test sample PLC programs for various applications. We welcome suggestions for common applications that you feel was not yet clearly explained by the Programmer's reference, or covered by the sample programs included with TRiLOGI software or FAQ board in the forum page.

27
Frequently Asked Questions / Understanding Super PLC Serial Communications
« on: November 06, 2007, 11:10:26 AM »
Here is a breakdown of how the serial communications work on the Super PLC:

Each of the two or three serial ports (RS232 and RS485) has its own serial buffer of 256 characters and information sent from external devices is accepted into the serial buffer automatically. Once inside the serial buffer the information will stay there until it is read into the PLCs memory (programmed by user) or it is written over due to buffer overflow.

If the information coming into the serial buffer is formatted in a protocol that the PLC understands then the PLC will handle it automatically and transparently. The Protocols that the PLC understands are MODBUS RTU/ASCII, OMRON C20H, and the Native PLC Host Link Commands.

If the information comes in a format that the PLC doesn't understand (Bar Code Scanner, Digital Scale) then the data being sent will have to be read into memory using one of two commands. One command (INPUT$) will read the contents of the serial buffer in the form of CR- (Carriage Return or ASCII 13) - terminated string up to a maximum of 70 characters at a time into a string variable. Therefore, the data will be in the form "H12345" + CR and will have to be interpreted by a user programmed function.

The other command (INCOMM( )) will read the contents of the serial buffer one character at a time in binary. The user will have to know what data is being sent by the device in order to write a function to handle it. When the buffers is empty, INCOMM( ) function returns a -1.

28
In older days where M-series PLCs were programmed with DOS version TRiLOGI, there was an option in DOS TRiLOGI to put a transfer password into the PLC to prevent accidental overwriting of  PLC program.

This original transfer password protection scheme has been abandoned when Windows version of i-TRiLOGI was introduced in 2001 to avoid confusing user with too many different password schemes (such as TLServer login password,  and host link access password control by the TBASIC SETPASSWORD statement).

Under normal operation the PLC would not ask for transfer password. However, if there is a power glitch that corrupts or damages the EEPROM then there is a possibility that a password area inside the EEPROM has been written with some random data and the PLC thinks that a transfer password has been set and will request for it when you try to transfer a program to the PLC.

To clear the transfer password, enter the following command string into the TLServer's Serial Port Setup screen:

  @01$cKILL00*

(This is assuming that the PLC ID = 01, please subsitute with your PLC ID if it is not 01). This command will delete the transfer password and clear the program. The PLC will return a response string when the above command is accepted and then you should be able to transfer program to the PLC.

If the above procedure does not clear the password then there is a possibility that the PLC's EEPROM is damaged and it need to be replaced. Please contact Tech support to purchase spare part.


29
Technical support / MOVED: Logic Diagram Builders
« on: March 07, 2007, 09:45:03 AM »
Not related to TRi PLC. Moved to General Discussion.

http://www.tri-plc.com/yabbse/index.php?board=5;action=display;threadid=1122

30
Frequently Asked Questions / How to Display Decimal Point on LCD
« on: December 21, 2006, 03:57:51 PM »
Although TBASIC doesn't support floating point, you can still display numeric with decimal point on the LCD easily. This will be useful if you are using fixed point arithmetic where an integer unit represent a fraction of the real number.  For example, if every unit represent 0.01 degree, then a quantity 228.66 will be represented as 22866.

To display DM[1] with two decimal places, do the following:

SETLCD 1,1, STR$(DM[1]/100)+"."+ STR$(DM[1] mod 100,2)


Pages: 1 [2] 3 4