

I. Introduction
The TRi-ExcelLink software provide you an extremly simple-to-use, two-way linkage of data between the PLCs and an MS Excel* spreadsheet. It is an application software that works in tandem with the TLServer program (this is included in your Internet TRiLOGI Version 5 or 6) or work with the Ethernet port on PLC models that are so equipped . Hence, not only can you capture PLC data directly from the local PC running both the TLServer and ExcelLink program, you can also simultaneously capture data from up to 16 TLServers or Ethernet PLC that are connected to the LAN or the Internet! This is illustrated in the following diagram:

Now, think of what you can do with such incredible power! You can build an extremly low cost data acquisition system that can simultaneously collect factory floor data from hundreds of PLCs situated in multiple locations around the world into an Excel spreadsheet in real time!
|
- Run in the background: Since TRi-ExcelLink is a client to the TLServer or FServer, you can run both the TRi-ExcelLink and TRiLOGI software simultaneoulsy. Hence a technician can perform a local monitoring of the PLC operation while the TRi-ExcelLink software is collecting data, without interfering with each other. In addition, multiple TRi-ExcelLinks can run simultaneously at different locations. Hence in the above examples, the management in London, China and Santa Clara all can view the production status of all sites simultaneously in their spreadsheet, and of course, all in real time!
- Extremely Easy to Use: Unlike most other DDE server software on the market which require you to write macro programs or enter specific formula in the spreadsheet before you are able to capture any data, the TRi-ExcelLink software can open up a blank, new spreadsheet and start filling in data the moment you click on the "Run" button. All the actions are configured using very simple forms.
- Very Low Cost: Most other DDE servers in the market (e.g. WinWedge, Modlink) cost from US$250 upwards. But the TRi-ExcelLink software is now available at only US$149.00 i.e. less than half the price for most other rival products that require a steep learning curve before you can use them.
II. Setting Up ExcelLink
The TRi-ExcelLink software works by acting on a number of "Actions" that you can define to configure which data you want to read or write, from which PLC, and the IP address of the TLServer to which the PLC is connected. The "Action" also define the spreadsheet cell or a range of cells that the data should be stored or retrieved for read/write actions to the PLC.
Since the M-series PLCs rely on the TLServer to provide them the network connectivity as well as managing the username/password authentications, the TRi-ExcelLink software groups all the "Actions" that pass through a particular TLServer as a "Site". A Site is simply a PC running the TLServer software that has an IP address and with a specific username/password (if it is connected to the LAN or the Internet it will have an IP address shown on the TLServer screen. TRi-ExcelLink software can also work in the local mode on the same PC where the TLServer is located, in this case the IP address is simply a localhost address 127.0.0.1:9080)
The program allows up to 8 Sites" to be defined and accessed simultaneously. Each Site can be defined with up to 100 independent Actions to interact with the PLCs that are connected to this Site (i.e. the TLServer). Hence, the TRi-ExcelLink software allows you to, on a single Excel spreadsheet, display or write data to hundreds of PLCs in real time!
Two Methods of Executing TRi-ExcelLink Actions
 Button: Normally you begin by defining the active Sites and the active Actions using the TRi-ExcelLink extremely simple user-interface. When you are ready for the show, just click on the "RUN" button to launch the actions. The software will first process all active Actions once, follow by periodically processing those READ Actionsthat have a non-zero "Period" parameter. This is the simplest and most natural way of using this software and requires no programming at all. There is no need to write any macro or equations in the Excel spreadsheet because TRi-ExcelLink software automatically fills the spreadsheet cells with data according to the manner defined in their "Action Configuration" window.
- DDERequest from other DDE clients: TRi-ExcelLink software is itself also a DDEserver, and all the pre-defined "Actions" can also be remotely triggered by other DDE-capable client programs such as MSExcel, MSWord via theDDERequest. This enables great flexibility to programmers who wish to have finer control of the data capturing process in their Macros, yet saving them lots of work in defining where to store the captured data.
Home Screen
Once the TRi-ExcelLink software is running, you will see the following screen:
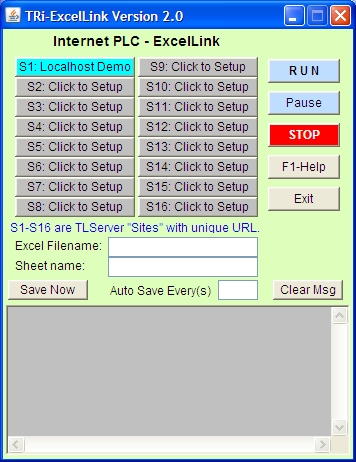
- S1-S8: Click on any of the S1 to S8 button to define the configuration for a "Site". A Site is a TLServer that has an IP address, a username and a password associated with it. Each Site can be defined with up to 100 "Actions". You can define a Site and selectively define it as either "Active" or "Inactive".
An active Site appears as a light blue color button. Inactive Sites are shown as gray color buttons. If aSitename has been defined it will be displayed on the button (e.g. "Localhost Demo" in the diagram).
- Excel Filename & Sheet name: The Excel document to be opened and used for interaction with the PLC. If the Filename is left blank then a new file (e.g. "Book1") will be opened everytime a new action cycles begin.
- Button: When you click on this button, the TRi-ExcelLink software will open the Excel File (if it has not already been opened), log-on to all active Sites and carry out the active Actions defined in each Site. The "RUN" button will turn into green color once the process has been successfully started, and the "Stop" button will turn into pale blue color. The following events will take place:
- All active Actions, including those with period = 0.0s, will be executed once when the "RUN" button is first pressed.
- All active READ Actions with non-zero period will continue to capture data from the PLC periodically.
- An active WRITE Action will be executed only once whenever the "RUN" button is pressed and automaticaly whenever any of its defined cell range in the spreadsheet has been changed.
- If the process is already running (i.e. "RUN" button has become green color), then each time you press the "RUN" button again all those Actions with period = 0.0s ( including all the "Write" Actions ) will be executed once. This also applies also to the case where the run action has been paused by the "Pause" button.
 Button: Click to temporary suspend all readings and writings to the Excel Spreadsheet. The program will not log out of active TLServers that it has already logged on so that it can resume interaction with the spreadsheet immediately when it is released from the "Pause" state. This button will change to yellow color when paused. Clicking on the "Pause" button again will release the program from the "Pause" state.
Note: You should always pause the program before you start to manipulate the Excel spreadsheet such as clicking on their scroll bars, saving the spreadsheet etc. This is because the Excel program sometime behaves unpredictably if it receives DDE commands while interacting with users. E.g. it could clear a large part of the spreadsheet or rejecting or ignoring incoming DDE commands and hence resulting in loss of data.
 Button: Click to stop all the Actions and log out from all the active Sites. The "Stop" button will turn into red color and the "RUN" button will turn into pale blue color button when all the processes have been stopped. STOP button will also cancel the "Pause" state if the program has been paused.
 Button: End the program by clicking on this button. You will be asked if you wish to save all the configuration settings of Sites and Actions defined in this session. All configuration settings are saved in the "EXLCONFIG1.CFG" file in installation directory of the program. You can copy this file to another computer to obtain the same configuration settings for the TRi-ExcelLink software.
 Button: Click to force the Excel program to save the spreadsheet file immediately without the need to pause the program first. This is a safer way of saving the spreadsheet data than using the Excel's own "File -> Save" command. Please read the "Note" paragraph in the description of the "Pause" button above, to understand the reasons why you should avoid using the "File->Save" command in the spreadsheet program to save the data, unless you first pause the program using the "Pause" button.
 : You can also elect to save the spreadsheet file periodically. Enter the number of seconds between two consecutive "save" actions. The ExcelLink program will then periodically command the Excel program to save the spreadsheet file whenever it has made changes to the spreadsheet. If the program is not writing new data to the spreadsheet (such as when it is in STOP or PAUSE mode) then it will not trigger the save action. Note that Excel spreadsheet can take up a few seconds to perform the save operation before resuming to accept incoming data from ExcelLink, so there may be loss of new incoming data during the saving operation. Leave this field blank if you do not wish to auto-save the spreadsheet.
- The bottom-most gray text window is for displaying system messages, including error messages.
III. Site Configuration
When you click on any of the S1 to S8 buttons in the Home Screen, the Site Configuration window is opened as shown below. Note that the Site Number (1-8) is displayed in the Titlebar of this window:
You define the parameters required for logging in to the TLServer:
- Site Name helps identify the URL (this is optional). If defined the Site Name text will be displayed on the S1-S8 buttons in the Home screen.
- URL: The IP address and port number E.g. 127.0.0.1:9080 (that will be for local host) or 192.168.123.1:8080, etc.
- Username - a user that has been defined in the TLServer.
- Password - the password associated with this user.
- Active checkbox: Check it to define this as an active Site. i.e. all the active Actions defined in this Site will be executed when "Run" button of the home screen is clicked. An active Site will also be shown as a light blue color button in the Home Screen.
- A1 to A100 buttons: Double-click on any of these buttons allow you to define up to 100 Actions per Site. An Action is where you define which data element to extract, from which PLC, which spreadsheet cell or range of cells that you want the data to be stored to or taken from, and how frequently you want it done. An Action can also be set active or inactive and those active ones are shown as light blue color buttons.
- Some parameters of the defined Actions are displayed alongside their respective button for a quick glance of their definitions. An undefined Action will not have any parameter displayed next to their button.
IV. Action Definition
The Action Definition window will be opened after you double-click any of the A1-A100 button in the Site Configuration Window.
|
|
- Active checkbox - Determine whether this Action you defined here is active. You can define a number of Actionsand selectively activate some of them in accordance to your current objective. An "active" Action will be displayed as a light blue (A1-A100) button in the Site Configuration window for easy identification. Only "active" Actions will be executed when the "Run" button in the Home Screen is pressed. (Note: An inactive Action can also be executed by remote DDE client using DDERequest commands as described in the document section "DDE Control" below)
- PLC ID: 00 to FF (hex) - Since each TLServer can connect to a network of PLCs on an RS485 network, you can specify the ID of the PLC for this Action. Theoretically up to 256 PLCs may be connected to a single TLServer. Enter the ID as a hexadecimal number from 00 to FF.
- Period: If this is a READ Action this parameter determines how often the action should be repeated periodically. If you want to capture the value of a data every 5 seconds then set it to 50. If the period is set to 0 then this Action is only executed once whenever the "Run" button is clicked and the Action will not be repeated periodically.
-
Note: The Period simply determine the "sleep" time between two consecutive actions and is NOT an exact, deterministic interval from one execution of this Action to its next execution. The time delay caused by execution of each action is not accounted for. Some actions, such as reading or writing a range of DMs, may take up to several seconds to complete and it will not be possible to execute other actions at the precise interval as specified in the "Period" field.
If you define an Action as a "Write Single Variable" or "Write A Range of DMs", the program automatically changes the "Period" field to 0. There is no need to keep writing to the PLC unless there is a change in the data to be written. Hence these kind of Actions are only executed whenever the "Run" button in the home screen is pressed and when the data in the spreadsheet cell(s) have been changed (the latter is an automatic procedure).
|
 |
This selection, combined with the index to the system variable defined inVar. Index, is used to select the exact variable that you wish to read from or write to the PLC.
|
 |
- Var. Count: This field only appears when the "Action" choice is either to "Read A Range of DMs" or "Write A Range of DMs". It indicates the total number of DMs of interest, starting from DM[ value in Var. Index].
In this example, 10 DMs starting from DM[3], will be taken from the PLC and fill into the spreadsheet cells. i.e. DM[3] to DM[12] are the data to be captured into the spreadsheet.
Excel Linkage Cell Locations
The TRi-ExcelLink software lets you define where and how you want the captured data to be stored into the Excel spreadsheet. When capturing data from a single variable or a range of DMs, you can define it such that the captured data will either occupy a single cell (for "Read Single Variable") or populate a range of cells defined here. You even have a choice of whether the cells are being filled from left to right or top to bottom and whether the data should be rolled over once the data have populated the entire defined range of cells.
- Start Col & Start Row: The first cell location where data will be captured to or obtained from. E.g. Cell A10 is Col.= A and Row = 10.
- No. of Col. & No. of Row: These two numbers define a range of cells for capturing the data from READ actions or holding the data to be used for WRITE actions. If the action is to read a single variable, then the entire range of cells will be filled one at a time with the direction defined by the radio buttons: "Fill Row, Then Down" or "Fill Column, Then Right". If you want only a single cell to capture the data in real time, then set both numbers to "1".
When "Write Single Variable" is selected, both the No. of Row and No. of Col. fields will be set to1. When "Read A Range of DMs" or "Write A Range of DMs" are selected, the No. of Row x No. of Col. has to be greater than or equal to the number defined in the "Var. Count" field to be accepted. Roll Over are not allowed in reading or writing DMs.
- "Fill Row, Then Down" or "Fill Column, Then Right" radio buttons: If "Fill Row, Then Down" button is selected, then in this example, the data will be filled starting from cell A10, B10, C10, A11, B11, C11..... all the way until C13. If "Fill Column, Then right" button is selected, then the cells will be filled in the following order: A10, A11, A12, A13, B10, B11, B12, .... until C12, C13.
- Roll Over when filled checkbox. When unchecked, the data capture operation will stop after the last cell (C13 in this example) is filled. If checked, then the data filling process will roll over to the first cell when the last cell has been filled. In this example, after filling the cell C13, the next captured data will be filled to the cell A10, B10...... and so on. If both No. of Row and No. of Col. are "1" then this checkbox will be automatically checked by the software to avoid the misperception that the data were not captured.
- Time Stamp - If checked, then the column before (to the left) the "Start Col." will be used to record the time-stamp of when the data are being captured . In this case it is obvious that "Start Col." cannot begin from Column A because then there wouldn't be any column before column "A" for recording the time-stamp. The program automatically pushes the "Start Col." to column "B" when this happens.
Note that the time-stamp recorded will be based on the clock in the PC where the TRi-ExcelLink runs on, and not from the real time clock in the PLC.
V. DDE Control
When the TRi-ExcelLink program is loaded an internal DDEServer will be running regardless of whether the "Run" or the "Stop" button has been pressed. This allows other DDE clients such as a macro in the Excel spreadsheet or Wordbasic macro to remotely control the executions of the predefined "Actions" defined in the TRi-ExcelLinkprogram. The remote DDE client can even trigger the "Run", "Pause" and "Stop" button to control the operation of the TRi-ExelLink software. An Excel file "testmacro.xls" which contains some macros for sending DDERequest to the TRi-ExcelLink software can be found at the program's installation folder.
Only the DDERequest command is supported by the TRi-ExcelLink DDE server with the following parameters:
DDE System Name: "XLLINKSVR" DDE Topic Name= "Action" Purpose - For requesting the execution of an "Action" defined in the program. Item - "SnAm" where n is the Site No. (1-8) and m is the Action No. (1-100).
Returned String: OK - action has been scheduled successfully. Otherwise error string will be returned.
Note: Both active and inactive "Actions" can be executed by this DDERequest. However a Site must be active and running before its defined action can be executed due to the need to log-in to the TLServer of the defined Site.
DDE Topic Name= "Command" Purpose - For controlling the "Run", "Pause" and "Stop" button of the TRi-ExcelLink program. Item - Only three Item names are currently supported: "Run", "Pause" and "Stop".
Returned String: OK - command has been performed.
Examples 1: - Trigger the action defined at: Site #1, Action #1 Sub Macro1( )
channelNumber = Application.DDEInitiate("xlLinkSvr", "Action")
DataArray = Application.DDERequest(channelNumber, "S1A1")
Application.DDETerminate channelNumber
Sheets("Sheet1").Range(Cells(1, 1), Cells(1, 1)).FormulaArray = DataArray ' display the returned string at cell A1.
Example 2: - Trigger the action defined at: Site #5, Action #67 Sub Macro1( )
channelNumber = Application.DDEInitiate("xlLinkSvr", "Action")
DataArray = Application.DDERequest(channelNumber, "S5A67")
Application.DDETerminate channelNumber
Sheets("Sheet1").Range(Cells(1, 1), Cells(1, 1)).FormulaArray = DataArray ' display the returned string at cell A1.
Example 3: - Trigger the "Run" button of the TRi-ExcelLink software. Sub RunXLLink( )
channelNumber = Application.DDEInitiate("XLLinkSvr", "Command")
DataArray = Application.DDERequest(channelNumber, "Run")
Application.DDETerminate channelNumber
Sheets("Sheet1").Range(Cells(1, 1), Cells(1,1)).FormulaArray = DataArray
End Sub